

Are you planning to build a bilingual or multi-lingual WordPress website? An ‘easier to use’ translation plugin is all you require. This plugin gives you the capacity to translate your site to any language you like, starting from a front-end editor which functions like the customizer. Besides that, you do not require any programming language to operate TranslatePress.

Our primary focus in this article is the free version of TranslatePress, which you can get in the official WordPress repo. Information regarding the TranslatePress premium version can be found on TranslatePress’ website.
How to Install TranslatePress Plugin
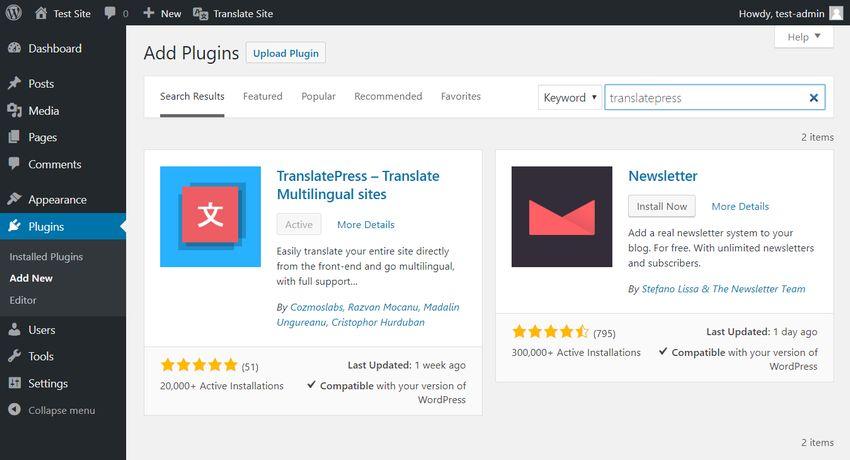
The installation process of TranslatePress plugin is similar to that of other WordPress Plugins. To install, go to click Plugins on your dashboard, select Add New, and then Install button of the plugin. After the installation, ensure you have activated the plugin.
Once your plugin is activated, two new menus will appear on your WordPress admin:
- In the top bar, you will see the “Translate Site” menu.
- At the Settings sidebar menu, a “TranslatePress” item will appear.
Furthermore, you can translate any page as you wish, because the front-end features the top menu.
Facing any issues with WordPress plugins? wordpress expert can help you.
Configuring the PluginSettings?
To configure the settings of the plugin, click the Settings icon, followed by TranslatePress admin page. The page comprises of three tabs, namely:
- Add-ons
- General
- Translate Site
The “Add-ons” tab comprises of add-ons. On the other hand, the “Translate Site” tab leads you to the front-end editor. Apart from one add-on which enables you to apply GET parameters in encoding language in the URL, the rest are of pro plans. Even so, the pro plan is a higher feature, which you do not require if you only want to translate your website. It is essential if you want to translate the site and establish a usage URL form.
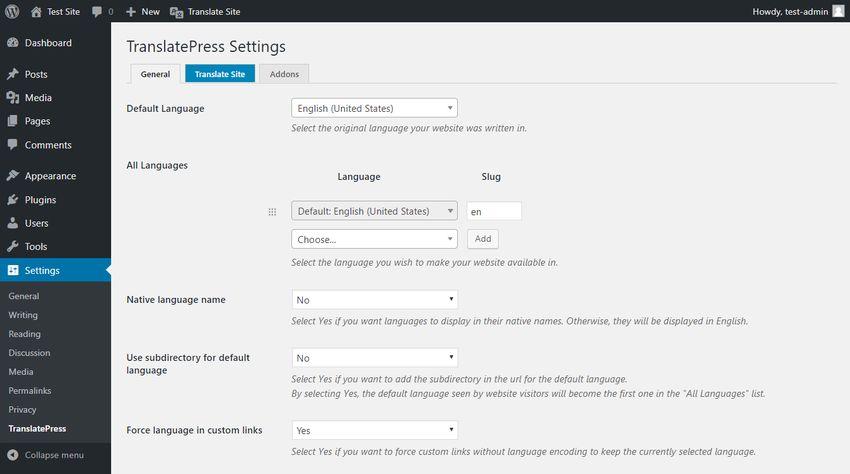
To set up your site translation languages, use the “General “tab.
The language you used to install your website is the default language of your admin interface. So, this is the tab you use if you want to apply a different default language. Just to the next “default language”, you can choose your site’s preferred translation languages.
Nonetheless, you can use two languages when using the free version. These are the default language, and another language of your choice,for example, Spanish and English. Thus, you must buy any of the pro plans, if you want to use multiple languages on your site.

In addition, you can also use native names to show the chosen languages. Here is an example, where “Spanish” is replaced by “español.”
How to Open the Front-end Editor?
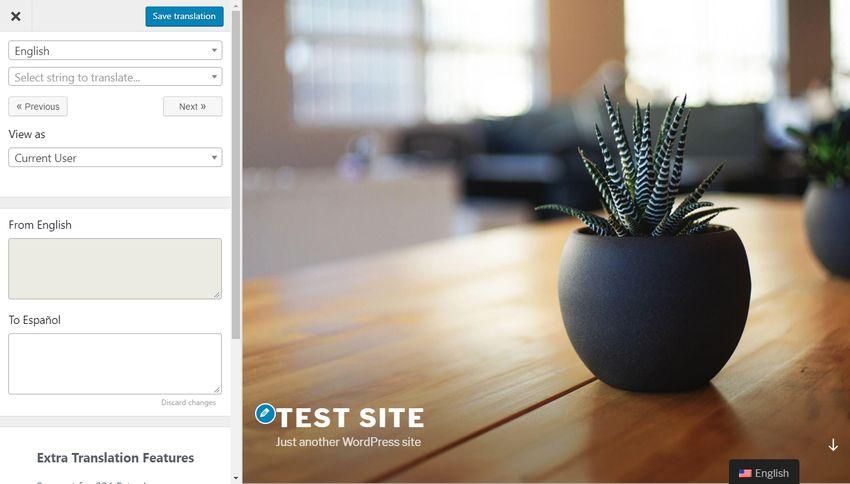
There are two ways to open the front-end translation editor. One is to click the “Translate Site” tab, which is on the settings page. The second way is using the top bar menu. The appearance and functioning of the front-end editor is same to that of the Customizer. Therefore, it is easier to learn and master it. The outcome of every change displays on the page in real time.
Upon opening the front-end editor, you will realize the language switcher display at the page bottom. Your users can easily change between your site’s versions using the switcher. The bottom of the page is the default spot of the switcher. However, Translate Press offers both default and short-code. The short-code enables you to place the language switcher wherever you want on your website. For example, you can place it on the sidebar, or your header menu.
Translation of a Page
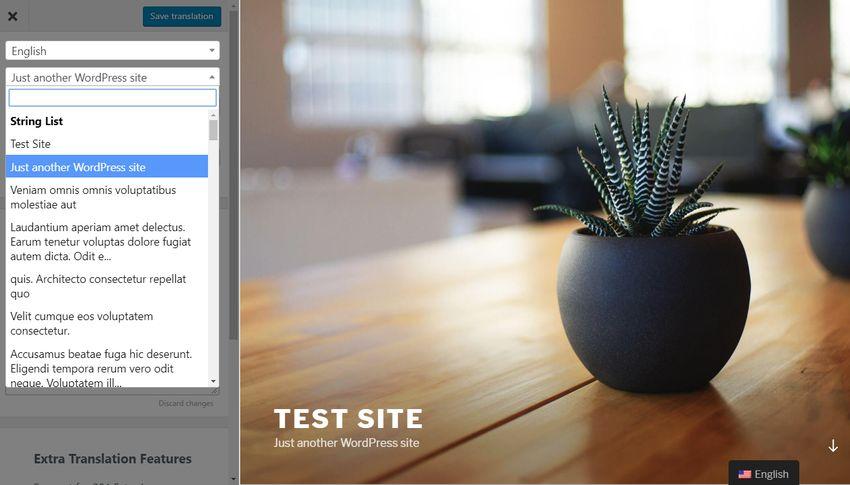
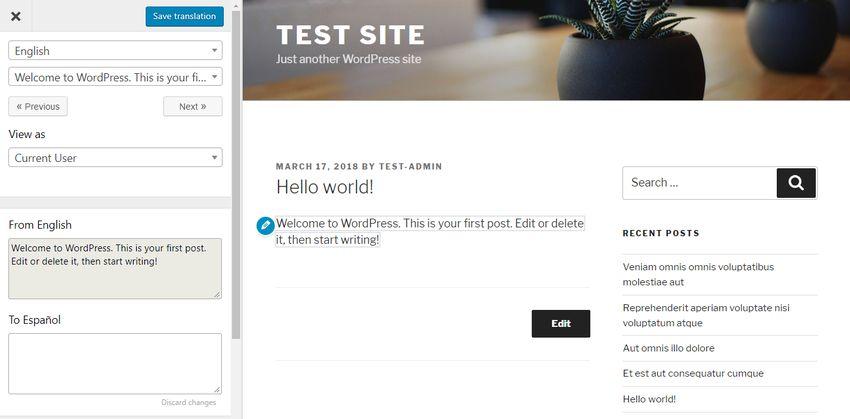
One of the most amazing things about Translate Press is its front-end translation editor. It features a handy dropdown list, where all strings appearing on the page can be located. All you need to do is selecting the string you would like to translate, and it will get displayed below the string list in the translation box.
For instance, the string chosen in this case is “Just another WordPress Site.” Apart from strings of a particular page or post, any string can get translated by Translate Press. In this example, the post is from Word Press admin settings.
Translate Press performs an automatic display of the string you have chosen, on the upper translation box, which is below the String list. You can perform translation at this point to the preferred language. Just type your translation content in the lower translation box.

Once your translation is ready, click the “Save translation” button, which is above the translation sidebar. As a result, your translated string will be saved in the database of Translate Press.
From our example, if we were to change from English to Spanish version, the site will display translated strings. But, pages that were not chosen for translation will be displayed in English.

Moreover, you can perform translation of strings at the front-end of your site, instead of the translation sidebar. To do so, hover your mouse on the string you would like translated. Click the small pencil icon that will appear. In turn, the highlighted text will immediately display in the translation box on the sidebar panel. Here, you perform translation as you wish.
Utilize the Translation Block Feature
You can perform translation of a page block by block, using the pencil icon. For example, you can translate every paragraph or list item as a single string. Are you wondering what will happen to a block element with many elements like many links? Are you supposed to translate one small element after the other? All that get solved by the “Translation Block” feature.
A green up arrow icon will show up next to the pencil icon, if a block has many HTML elements like highlights or links. After clicking it, Translate Presscombines all the HTML tags it locates in the block. As a result, you can perform their translation as a single string. But, the block translation feature is optional. So, you can translate one element after the other as per your desire.

Translation of Powerful Strings
The ability to translate strong strings is the other benefit of Translate Press. For translation of strings with one or more strings, you can use WordPressgettext. So, “gettext functions” can get used by plugin & theme authors, as well as the WordPress main team in adding powerful strings to their content. Strong content getsobtained from the database, whenever a user asks for page with powerful strings.
A good example of a powerful string is “Proudly powered by %s”. The %s variable gets calculated on the fly, as per an entry in the database. Also, TranslatePress shows gettext strings which are on a page in the same dropdown list like static strings. Scrolling down the string list is all you have to do, to locate the Gettext Strings at its bottom.
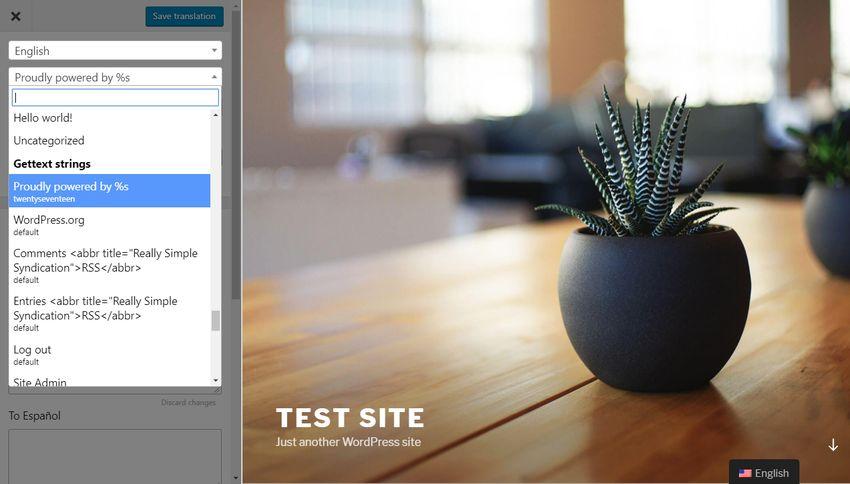
A different database table is used in saving Gettext strings from that of static strings. As a result, whenever you translate a gettext string, your translated version displays on all pages with similar string, and hence no more translation is required.
Google Translate
Did you know you can automate your translations using Google translate if your Google account is paid? To do so, you should produce a Google Translate API key, place it in the TranslatePress Settings page, and then activate it.
Only strings that you had not translated before get translated by Google translate. In addition, Translate Press enables you to perform editing of automatic translations when you want. All in all, you should always do the editing, because outcomes from Google Translate are mostly inaccurate.

A detailed guide on how to produce a Google API key and setting up automated translations effectively is available on TranslatePress docs.
To utilize Google translate feature, you should have a paid Google Cloud account. Although you can test this for free, you will have to pay for long term services.
Behind the Scenes of TranslatePress
Database is used in storage of translations made using TranslatePress. This plugin makes a single database for every language pair, and a gettext table for every language. Nonetheless, your WordPress admin does not have your translations. Also, exportation of your translations as effective PO and MO files is not possible.
You can have a view of your translations using the front-end editor, as long as the TranslatePress is functioning. However, moving your data is not easy. As a per TranslatePress roadmap, they have plans of making an add-on for effective exportation of data.
Conclusion
You do not require any programming knowledge to perform translation of your WordPress site, when using the amazing TranslatePress translation plugin. Apart from pages and posts, you can also translate strings, themes, plugins and powerful texts. Also, TranslatePress combines easily with Woo-Commerce. Thus, you can translate your online store with ease.
It is easier to use the amazing front-end editor, which occurs in real time. The functioning of the feature is similar to that of the Customizer, hence making the usability familiar to users. Nonetheless, if you have a production site where you want to use the plugin, you should consider data mobility, as improvement is required.
To learn more about creation of multi-lingual WordPress site, check our blog section. If you are still facing problems, you may take help of WordPress support services
Did you find this helpful? Do you have a comment or question? Do not hesitate to comment on our comment section, and we will respond.
